
Prepare For The Aerial Flight Prior To Departure-
1. Planning & Preparation
The best preparations for a great flight in the air start at the ground. There are things you can do to ensure a fun and productive experience on your next aerial photography flight.
Researching the destination is key to determining what you want. Do you have any particular landmarks or places that you would like to see? Spend some time learning about the region you will be flying over and the landmarks you can see from the air. Finally, visualize the final image you would like to frame. It will help you communicate with the pilot about your plans and routes.
For inspiration, you can also look at the work of other photographers. First, take a look at other photographers’ images and take note of what you like or dislike. Then, create your style to capture the scene in your way.
2. Find the Best Time to Take Aerial Photography Flights
Are you looking to capture sunrise? Sunset? Do you feel the middle of the daylight is too harsh? Consider the light conditions before you fly. We flew with this light condition, for example. Fly Jackson Hole, we wanted to capture the sunset on the Tetons from our plane. We could then see the Teton glow at the top. Communicate with your pilot to find out if they can operate at the times you want. There are restrictions for when companies and airports can take off.
3. Limit Yourself to Two Cameras
Time is crucial when shooting aerial images. We recommend that you bring two cameras bodies and your desired lenses. You can easily switch between lenses by bringing two cameras bodies. You’ll pay more attention to your gear if you have more than one device.
A combination of several devices can make two bodies. Phones? GoPros? And/or DSLR cameras. Of course, a GoPro is an exception. Strapped to your head Or Chest. You can keep your hands free. However, you should make sure that they don’t get in the way of your camera.
4. Select The Right Lens
The type of aerial photography you’re doing will determine the lenses that you choose. To cover a broad range of images, we like to have multiple lenses. Below are some lens recommendations for aerial photography flights and reasons to use them.
- EF 16–35mm f/2.8 — to shoot a wide-ranging landscape and interior shot of the helicopter or plane
- EF 24-70mm F/2.8 or RF 28-700mm F/2 — Great for taking wide shots or close-up photos of your subject. Also great for interior photos and portraits of people on the plane.
- EF35mm f/1.4 — Great for taking photos of large landscapes in low light during blue hours (before or after sunrise).
- EF50mm f/1.2 — Great for taking photos of a tight landscape during low light (before or after sunrise)
- EF 100–400mm f/4.5–5.6 — Great for capturing distant subjects like the Grand Prismatic and adding texture to your subject
Many brands offer very similar products. If you have questions about your particular camera, please ask in the comments section below!
5. The Right Camera
We’ve learned that DSLRs like Nikon, Sony, and Fujifilm have amazing capabilities for shooting high-speed moments. The primary photographer would use the camera during an aerial photography tour. Canon EOS R 5D Mark III and the 2nd shooter who uses the canon EOS 5D Mark IV The GoPro Hero7 to capture some behind-the-scenes
No matter what brand your camera is, the best aerial photography cameras must have high resolution and a fast shutter speed. For aerial photography, a camera with a compelling processor and a high-speed lens is the best combination.
6. Plan the Route with Your Pilot
Before you fly, it is important to communicate your expectations and goals with the pilot. You and the pilot are part of the same team. Therefore, having a common goal before and during flight is important. Although requests are welcome, it is important to remember that the pilot will know best. You may not know the area as well as they have flown it more times than you do.
Consider asking your pilot for their top picks during your research. Respect your pilot’s decisions and actions in critical moments. Your job is to keep you safe and your party safe. Listening to what they have to say and making their decisions are crucial.
7. You Should Check The Weather Before Taking Off (but don’t worry too much)
Weather conditions can change quickly, so be flexible with your schedule and attitude. When preparing your aerial photography flight, we strongly recommend that you book your aerial photography flight early in your trip so that you have enough time to cancel if necessary.
Are there clouds in the sky? Do not be scared? Clouds can bring out the drama in a photo like a sunny day can’t. It doesn’t matter how many times you visit a place, and it may look completely different.
8. Pack Extra Cards and Batteries
There is nothing worse than feeling in the moment that your battery has died or your memory card is full. To ensure that you have fully charged batteries, make sure you charge them the night before your flight.
Also, we like to keep the battery slot on our camera open beside the charger to ensure that we do not forget it and put back in before we leave. We like to carry extra batteries on our flights for aerial photography.
We recommend that you start your flight with a formatted card, preferably the largest, to ensure enough memory for your aerial tour. For example, a 64GB card would be sufficient to store 1,500-2,008 images during a 2-hour flight.
You may need to take your time depending on how much storage you have. It is very dangerous to run out of storage in mid-air. To be safe, we usually carry three more cards. You can easily store cards, batteries, and other items in your zip pockets for easy access.
Memory cards should be fast enough to read and write quickly to don’t miss any of the actions. These are the memory cards we use SanDisk Extreme Pro 128GB Cards are known for their high data storage and powerful processing power.
9. Wear Clothing That Allows For Easy Mobility
While safety buckles, straps, and headsets are essential for aerial photography tours, they can also make it difficult to feel comfortable in a small space. You have sole control over what you choose to wear on your flight. So make sure you plan for your outfit. Avoid bulky hoodies, and don’t wear long sleeves. Wear tighter fitting clothes that don’t catch on the wind or get caught in the sand.
You should also make sure you are comfortable in your seat before you leave. Before you take off, make sure to remove your seatbelt from your camera strap. Also, ensure that your arms and legs are free of obstructions.
Important: Make sure that your clothing has easy-access pockets. You can keep extra batteries and memory cards there, so you don’t have to worry about losing them.
UP IN THE SKY: Tips for Aerial Photography to Capture Special Moments
10. Set and Recognize the Ideal Camera Settings
It is important to be familiar with the basics of your camera when setting up aerial photos.
It is extremely important to have a high shutter speed. Even though it may not seem so, the helicopter or plane is moving very fast. Focusing your shots at 1/1,000th of a second or more can improve the chances of them being sharp. To balance the exposure, increase your ISO or adjust your aperture to f/3.5 or F/4 if you feel that the image is too dark.
Unexpected shaking and turbulence are also part of flying. Make sure you have image stabilization enabled on your camera.
These are the settings we use most often on flights.
- Shooting Mode Manual
- Shutter Speed: 1/1,000 to 1/8,000 of a second
- ISO: 100-3200
- Aperture: f/1.2-8
- AF Mode: Servo — Because the subject you are photographing is always in motion, use the Servo mode to continuously autofocus on it.
- Driving Mode: High-Speed Continuous (AKA Burst Mode).
- White Balance
- Metering Mode: Evaluation
- RAW Image Quality
11. Shoot Raw
Is your DSLR camera capable of shooting RAW photos? Most digital cameras automatically convert files to JPEG. These smaller files take up less space on your memory cards. However, we don’t want to save space if we lose image quality, especially when aerial photos are involved. Therefore, it is important to optimize your camera’s image rendering potential by changing the capture setting to raw.
Shooting in raw format will provide you more megapixels to work within post-production editing. In addition, these files allow you to adjust white balance, saturation, and exposure much more easily.
12. Minimize Window Reflection
If you are taking a flight particularly for aerial photography
(not just scenic or moving in contrast), the plane may have open windows or a slider from which you can stick your lens out. It is the best situation, as you don’t have window glare to worry about!
Helicopters and small planes often have plexiglass windows. It can create glare in your images. The best thing to minimize light distortions is to keep the front lens element parallel to the window. Sometimes, aircraft windows can be damaged, scratched, or even curled. Bring a lens cloth to wipe down your windows before you fly.
To minimize the glare, it’s important to wear dark clothes. You can see logos, letters, and even shiny belts in your photos, so make sure you have a dark, minimal wardrobe. If you can’t handle the reflection, try a lens skirt to block the glare. They can be suctioned onto windows, creating controlled lighting. You should ensure that the one you buy can accommodate your longest lens.
13. Shoot in Landscape and Portrait Orientation
Sometimes excitement can get out of control when you are in the air, seeing the magic unfold before your eyes. First, you can shoot portraits (horizontal orientation) or landscapes (vertical orientation) to create various images. Then, diversify your images and consider the composition of the final images. This will give you more options for prints, posters, or client requirements.
14. Take the Time to Shoot!
Keep shooting. Take advantage of the time you have in the sky. We see photographers’ biggest mistake when they review their photos on the LCD every time they release the shutter.
It wasn’t worth it to sit and look at your photos. Keep shooting. You can review photos once in a while but not every single time you take one. Otherwise, you will miss much of the action.
You may feel that you see the same composition every time. However, even the smallest change in angle of elevation can make a big difference. So consider how you can improve your next photo.
15. Forget the Lens Hood
The pilot will likely tell you to exclude the hood. However, if they don’t, it’s likely a good idea. There are many reasons why you should leave the lens hood at home. If it falls, it could cause damage to the aircraft, injury someone on the ground, or limit your freedom of movement in the cabin. You can adjust your angles to reduce glare or shield the lens with your hand. You can reduce the glare by wearing dark clothing.
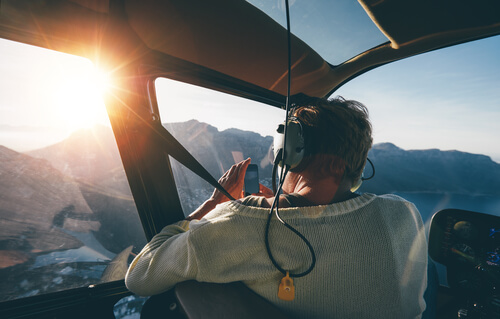
16. Do not forget the interior!
It’s always nice when you look back at your flight experience. Who was there? How did the cockpit look? Who was your pilot
We strive to capture the most memorable moments from our experiences when we take photos. We love to capture everything, including the details in the cockpit, the textures on the pilot’s hands, the pilot’s portrait while they fly the plane, and so much more. So in addition to the stunning photos out the window, be sure to capture the interior of your plane! Photograph the buttons, handles, and headsets.
POST FLIGHT – How To Share & What To Do With Your Photos

17. Share Your Work!
You’ve worked so hard into reading these aerial photography suggestions, kudos for making it this far! The world must see your excellent work. You can share your photos by tagging the airline on social media or sending them previews via email. They will be grateful.
Additional Tips For Aerial Photography
How To Handle Doors-Off During The Flight
Aerial photo tours that take you through very exciting experiences. The wind whips between your feet, and you can feel it between your subject and you!
There are no doors, which means there are no barriers. This allows you to forget about the worry about stained windows and warped glass. Safety considerations are more important when there are no doors.
These tips will help you fly doors off.
1. Attach The Camera To Your Body
You should secure your camera for all aerial photography flights and it is especially important when you are shooting without a door. You can use the default neck strap on your camera, but it may be a bit restrictive depending on what photos you are taking. Your arm should be extended enough to allow you to hold your camera securely, but not too far.
Use the following accessories to attach your camera to your body.
- CL-3 Clutch from Peak Design — Recommended using in a windowed aircraft
- BlackRapid Sports Breathe Camera Strap
- HoldFast Money Maker — Quick access for two cameras
2. Keep Your Accessories At Home
The lens hood that we mentioned earlier? The cleaning cloth? You can get rid of them for a doors-off flight. They could not only get in the way but also pose a safety risk. It could prove fatal if something falls from your camera and get stucked into the propellers. So do not take chances with add-ons or extras.e
3. Wear Proper Gloves
Temperatures can fall drastically at high altitudes. Combine that with the high winds, and it can take a toll! This tip is dependent on the location, but we recommend that you pack gloves for your aerial photography tours. It is important to consider versatility, warmth, mobility, and versatility when choosing gloves. For maximum warmth and comfort, we prefer gloves with touch-screen compatibility and removable finger covers.
Doors closed? You might consider an open-mitten style with a shell liner inside. This will not only keep your hands warm but also allows you to use your extremities if necessary.
4. Dress for Weather
It is important to wear clothing that allows for mobility and comfort while flying. Winter is a good time to add layers to help you stay warm in the cold, high-altitude air.
Under your regular clothes, we recommend that you wear a thermal layer (pants + top). You should also wear two pairs of socks, and choose shoes that keep your feet warm. Keep your neck and face toasty with a double pair of socks—this fleece balaclava. You should bring some headwear such as a beanie. However, it shouldn’t have a pompom on the top. This could interfere with your aerial headset.
Did you take away anything new from this article? What was your favorite takeaway from this post? Let us know your thoughts below in the comments section! These aerial photography tips will help you feel more confident and knowledgeable for your next flight.
Do you have a direct email I can contact? I am looking to license footage of Lia Fail.